Craft a Classic: Free Rocking Chair Blueprints for a Professional Finish
The gentle rhythm of a rocking chair, the comforting embrace of its curves – there's a timeless appeal to this classic piece of furniture. Building your own rocking chair not only offers immense satisfaction but also allows you to customize every detail. Forget flimsy, mass-produced designs; this guide provides you with access to free rocking chair woodworking blueprints, guiding you towards a truly professional-looking finish. Prepare to transform wood into a heirloom-quality piece you'll cherish for years to come.
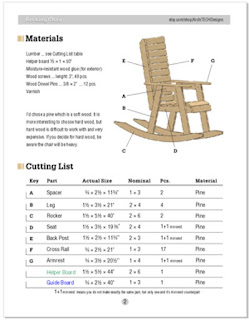
Finding Your Perfect Blueprints
The internet offers a treasure trove of free rocking chair blueprints. However, discerning quality is key. Search for blueprints that provide detailed diagrams, including multiple views (front, side, top) and clear dimensions for each component. Look for plans that specify the type and quantity of wood required. Don't hesitate to read reviews of the blueprint creators; a well-reviewed plan significantly reduces the risk of encountering confusing instructions or inaccurate measurements. Websites specializing in woodworking plans are excellent resources, but also consider exploring community forums and blogs dedicated to woodworking enthusiasts – often, individuals share their meticulously-crafted plans.

Choosing the Right Wood
Wood selection drastically impacts the final aesthetic and durability of your rocking chair. Hardwoods like oak, cherry, or mahogany offer superior strength and longevity, lending themselves to intricate details and a refined finish. Softer woods like pine are easier to work with for beginners, but require more careful handling to avoid dents and scratches. Consider the overall style you're aiming for. A rustic design might pair beautifully with knotty pine, while a sleek, modern rocking chair might better suit the smooth grain of cherry. Your blueprint should specify wood requirements; however, always double-check the recommended species and thickness to ensure suitability for your chosen design.
Essential Tools and Techniques
Building a rocking chair requires a combination of precision and skill. Gather your tools before you begin. Essential tools include a table saw, miter saw, planer, jointer, sander, drill, and various woodworking hand tools. Beyond the basic tools, you might need specialized jigs for shaping curves or creating accurate mortise and tenon joints (depending on the complexity of your chosen blueprint). Mastering fundamental woodworking techniques like accurate measuring, cutting, and joinery is paramount. If you lack experience with these techniques, investing time in learning through online tutorials or attending woodworking classes is highly recommended. Safety is paramount; always wear appropriate safety gear, including eye protection and dust masks.
Mastering the Finish
The finishing process elevates your rocking chair from a functional piece to a work of art. Start by sanding meticulously, progressing through progressively finer grit sandpaper to achieve a smooth surface. Consider applying a wood conditioner before staining or painting to ensure even color absorption. For a truly professional finish, consider multiple coats of stain, allowing each coat to dry completely before applying the next. Finally, seal the wood with a clear coat of polyurethane or varnish to protect it from wear and tear. This protective layer enhances the longevity and beauty of your rocking chair, ensuring it stands the test of time.
Beyond the Blueprints: Adding Your Personal Touch
While the blueprints provide a solid foundation, don't be afraid to inject your creativity. Consider adding subtle carvings, inlays, or custom-designed upholstery. The rocking chair is your canvas; let your imagination guide you in crafting a truly unique piece reflecting your personal style. You might even consider experimenting with different finishes—a distressed look, a vibrant paint job, or a clear finish that showcases the wood's natural beauty. The key is to build with confidence and attention to detail, and to enjoy the creative process.


0 comments:
Post a Comment